Leave Your Message

7 Tips for Choosing a Sleeve Printing Machine

A sleeve label can make a product easier to recognize, but print quality starts well before the first roll runs. Choosing a Sleeve Printing Machine is a production decision, not just a price comparison. Small differences matter. Line speed, film type, label dimensions, and ink requirements all affect whether a machine fits your work. A unit designed for short, frequent jobs may not suit a plant running long shifts. Nor does a high speed figure guarantee usable output if registration drifts or setup takes too long.

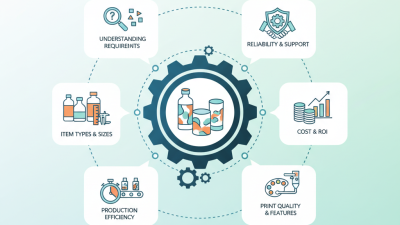
This guide offers seven practical tips for evaluating equipment with fewer assumptions. Begin with the materials and finished labels you actually use, then compare compatible print processes, color capacity, web width, and changeover needs. Ask suppliers for sample runs using your artwork and substrate, and inspect fine text, color consistency, drying, and waste during startup. Request clear details about service support, spare parts, operator training, and maintenance intervals. Easy to miss. A specification sheet cannot reveal every production problem, and one successful demo is not proof of long-term reliability. Record your expected volumes and total operating costs, then weigh them against realistic output and downtime estimates. The right choice depends on your constraints. With a careful checklist, buyers can ask better questions, compare quotations fairly, and select a machine that supports dependable sleeve printing as requirements change.
7 Tips for Choosing a Sleeve Printing Machine

Define Your Sleeve Format, Materials, and Production Volume

Before comparing a sleeve printing machine, define the format your production line will run. A full-body shrink sleeve, a tamper-evident neck band, and a stretch sleeve need different web widths, repeat lengths, and finishing steps. Measure the layflat width and repeat length using approved artwork or a physical sample. Account for overlap, sealing method, and shrink direction. Small errors matter.

Film choice affects print quality, web handling, and performance during shrinking. PETG, PVC, OPS, and stretch-grade films behave differently under heat and tension. Check that the press can handle your film thickness and width, and confirm ink and drying compatibility. Then test a real sample through printing and downstream application. A specification sheet helps, but it cannot replace a trial. I’ve seen teams assume two similar films would run alike; that assumption can cost time.

Estimate production volume using saleable output, not only the machine’s advertised peak speed. Include setup time, artwork changes, cleaning, and expected downtime. A machine suited to long, steady runs may be awkward for frequent short orders. Be realistic about growth, too, but avoid paying for capacity you may not use. What feels like a safe buffer can become excess investment.
Compare Machine Types and Their Application Range

Choosing a sleeve printing machine starts with the job, not the headline speed. Flexographic presses suit repeat orders and many film types. Gravure can deliver consistent quality on very long runs, but engraved cylinders add cost and setup time. Digital presses support short runs and frequent artwork changes. They may not match conventional presses on long-run unit cost. Small details matter.

The application range differs too. Shrink sleeves need heat-shrink film, careful tension control, and artwork adjusted for distortion. Stretch sleeves avoid the shrink tunnel and fit containers through mechanical stretch. A printer does not apply sleeves: application equipment handles cutting, seaming, and placement. Grand View Research’s Shrink Sleeve Labels Market report valued that market at about USD 13.7 billion in 2023 and projected 5.4% annual growth through 2030. This signals demand, not a universal machine choice.

Compare web width, color capacity, drying method, register control, and changeover time against actual orders. A line serving beverage bottles may need different speeds and film handling than one making sleeves for shaped personal-care containers. Ask for a trial using your film and artwork. Watch for wrinkles at the shoulder and color shifts near the seam. There is no perfect line. A quoted top speed can be misleading; real output depends on setup, operators, and job mix.

Assess Printing Quality, Speed, and Changeover Needs

A sleeve printing machine should be judged on the finished sleeve, not just its advertised resolution. Check fine text, solid-color coverage, registration, and image distortion on the actual film you plan to run. Shrink sleeves can shift during forming, so inspect samples after shrinking them onto containers. A sharp flat sample is not enough. PMMI’s 2023 State of the Industry report valued U.S. packaging machinery shipments at $10.9 billion in 2022, an 8.2% increase over 2021. That growth signals a busy equipment market, but it does not prove a machine suits your production mix.

Speed figures need context. Ask suppliers to demonstrate sustained output using your artwork, film, and inspection criteria—not a brief run on easy material. Track usable sleeves per hour, rejects, and stoppages. Then test changeovers: record the time to swap artwork, adjust tension, and reach acceptable print quality on the next job. Short runs make this especially important. A machine with a high top speed may lose that advantage when operators spend too long setting it up. Do not guess. Request a documented trial and clarify what counts as “changeover complete”; teams may define it differently. One awkward detail: real production rarely matches a tidy demonstration.

7 Tips for Choosing a Sleeve Printing Machine – Assess Printing Quality, Speed, and Changeover Needs

Tip What to Assess Practical Evaluation Criteria How to Verify
1. Define your sleeve requirements Film type, thickness, web width, repeat length, and the range of sleeve sizes you expect to print. Confirm that the machine’s supported substrate and format ranges cover both current jobs and realistic future requirements. Check compatibility with materials such as PETG, PVC, OPS, or other specified films. Provide representative substrate samples and job specifications. Ask the supplier to confirm the usable—not just maximum—web and repeat ranges in writing.
2. Evaluate print quality Color consistency, fine text, gradients, solid coverage, registration, and print defects across the web. Set acceptance criteria for each job, including color tolerance, registration, and minimum readable type. Tolerances should reflect the artwork, material, and customer requirements rather than a single universal value. Run a production-representative test using your artwork and film. Inspect samples under agreed lighting and measure color with a calibrated spectrophotometer where color matching is critical.
3. Compare sustained production speed Running speed on your actual film, repeat length, ink system, and quality requirements—not just the advertised maximum. Compare acceptable finished output per shift, including setup, inspection, and routine stops. A faster rated web speed may not improve output if drying, registration control, or downstream handling becomes the constraint. Request a timed trial on a representative job. Record running speed, good meters produced, waste, and stoppages after the press reaches stable production conditions.
4. Check color and registration control Color management, register adjustment, tension control, and the ability to maintain consistent print across the web. Look for repeatable controls and clear operating procedures. Confirm how the machine handles film stretch, web tension changes, and register correction during acceleration and steady running. Test a multi-color job from startup through steady production. Review register variation and color readings at the beginning, middle, and end of the run.
5. Assess changeover time Time and labor required to change artwork, plates or cylinders, inks, substrate, and job settings. Compare the full changeover process, including cleaning and first-good-print approval. Calculate its effect using your typical number of job changes per shift; setup time can matter more than peak press speed for short runs. Time a changeover between two representative jobs. Record the number of operators, setup waste, and minutes from the last good print of one job to the first approved print of the next.
6. Review drying, curing, and inspection Ink compatibility, drying or curing capacity, ventilation requirements, and in-line defect detection. Confirm that the drying or curing system is suitable for the selected ink and film at the required production speed. Check what defects the inspection system can identify and how rejected material is marked or tracked. Run the intended ink-and-film combination at the target speed. Verify print is dry or cured as specified and review inspection performance using known sample defects.
7. Consider total operating cost and support Waste, energy use, consumables, maintenance access, operator training, and availability of technical support and spare parts. Compare cost per good meter or per finished job rather than purchase price alone. Include expected setup waste, routine maintenance, and the skills needed to operate the press consistently. Request a documented maintenance schedule and a sample cost calculation based on your job mix. Confirm training, service response arrangements, and lead times for critical parts.

Note: Machine performance depends on the press configuration, substrate, inks, artwork, and operating conditions. Validate key specifications with production trials using representative jobs.

Check Compatibility, Ease of Operation, and Safety Features

A sleeve printing machine should match the materials and formats you actually use, not just the sample shown in a demonstration. Check sleeve width, diameter, thickness, and material, along with the printing method and ink-curing requirements. A mismatch can cause wrinkles, slipping, or uneven color. Ask whether the machine handles your smallest and largest formats without lengthy adjustments. Then run a trial with your own sleeves. A neat demo can hide problems that appear during a full production shift.

Ease of operation affects both output and training time. Look for clear controls, readable settings, and simple access to changeover points. Watch an operator adjust the machine, load sleeves, and clean ink residue. Small details matter. Are instructions easy to follow? Can routine tasks be done without awkward reaching? Safety deserves the same close inspection. Check for guards around moving rollers, accessible emergency stops, and clear warnings near hot surfaces or curing equipment. Ask how cleaning and maintenance are performed safely. A machine may look straightforward, yet one difficult adjustment can invite rushed work. It is worth reconsidering any setup that depends on constant expert supervision.

Compare Total Ownership Costs, Service, and Upgrade Options

Tip: Compare the five-year cost, not only the purchase price. Include sleeves, ink, changeover labor, energy, cleaning, and expected scrap. Ask for a sample run using your actual artwork and substrate; record setup time and rejected material. McKinsey’s 2017 report, “Manufacturing: Analytics Unleashes Productivity and Profitability,” estimates predictive maintenance can reduce machine downtime by 30–50%. That is a broad industry estimate, not a guarantee for a sleeve press.

Tip: Check service before signing. Request written response times, technician coverage, spare-parts availability, and operator training details. Price routine maintenance separately from emergency visits. A low quote can become expensive when a small sensor failure stops a shift. It happens.

Tip: Review upgrade paths for controls, inspection systems, and compatible sleeve formats. Ask what can be added later, what requires factory installation, and whether older software remains supported. Compare upgrade costs with the cost of replacing the machine. Keep the assumptions visible in your spreadsheet; real changeovers may take longer than a sales demonstration suggests.